
Killing the UIKit Slowly
Introduction
SwiftUI is slowly taking over iOS, but same as with Objective-C don’t expect that this will happen fast. Swift was introduced in 2014 and there is still plenty of Objective-C code around. Objective-c is almost never used for the new code, still reading it and to be able to modify it is a very important skill to have. In my perspective this is even more true for swift. It is really important to know UIKit and UI creation options. It is good to have a preferred way for creating the UI where you can be a specialist. But it is also important to know other options.
When new developers start to learn iOS, the UI is mostly done by storyboard, IBOutlets and IBActions. The transition by segue. Auto Layout is at first sign easy. The learning curve is really fast. Visually creating UI in storyboard has advantages. It is easy to create a quick PoC (proof of concept).
But the sun does not always shine. When you need to add new elements or replace them, then start the issue with disconnected IBOutlets and IBActions. Next is that Constraints added by Interface Builder start to fail. Then if you did not split the storyboard, then after adding a bunch of ViewControllers it starts to open too slowly in the xcode. Not to mention if multiple developers start to work on the same storyboard, the merge conflict could be a day issue, sometimes almost impossible to resolve.
For this reason personally I like the programatically created UI approach. Maybe we need a bit more time to learn the basics, but after, it is much easier to create complex views with ease. In this article I will present the preferred way that I mostly use. And as an alternative the Visual Format Language way.
Project Preparation
If you read some of my articles, then probably you have heard about Layered Architecture. I will apply its basics on this example project also.
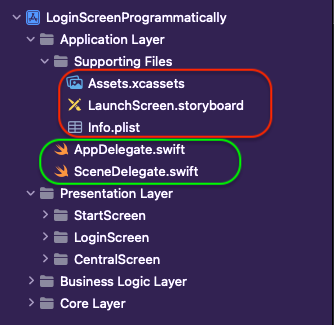
For start we will create a new folder structure and a bit reorganise the hierarchy. This means that Info.plist will also be moved. Because this project will fail if you try to build it. But don’t worry, the next image explains how to fix the Info.plist path. Basically xcode can’t determine where the Info.plist is, so it can’t read its content.

Next step is to delete the storyboard as we will not use it.
Deleting the Storyboard

Next is to open the Info.plist that we just have moved to the new path.

Next step is to delete the Storyboard from folder Main.storyboard.
Setup Your App SceneDelegate Programmatically
Wherever you use SceneDelegate or AppDelegate, the next steps are similar. If you started the app before this step, then you have probably seen a black screen. This is the reason as no window is created. Next code shows how to create it and how to set the rootViewController. Under 3. in the code is a small trick on how to extract dependencies into separate file.
Creating Windows and UIViewController
Setup UIView Programmatically
For example, we will create a Login flow. It has 3 screens the Start Screen(represent like pre-loader, auto login), Login Screen(where user can login with Username and Password) and Central Screen(main screen).

My favourite choice is to create separated lazy UIView elements. It is a neat way to group these elements in file but still to have nice Readability. As you have noticed I put really lots of colours on the views. This helps me to debug and understand what is happening easily. The styleUI() is to actually apply the theme, clear the bright debug colours.
Example of Programmatically created View.
- Really important part is:
translatesAutoresizingMaskIntoConstraints = false, it tells that we will not use Autoresizing Mask and to translate it into Auto Layout constraints. But we want to set the Constraints manually. - Next we need to use the method
addSubviewto add e.g.:UIView,ActivityIndicatorto the screen. After view is added but not set up. Usually it pop-up in the super view top corner, (x:y)-(0:0) coordinate. - Next thing is now to set up the Constraints. Like:
ativityIndicator.centerXAnchor.constraint(equalTo: centerXAnchor).isActive = true. This line tells us that on X coordinate, we want Horizontally to center theActivityIndicatorto the currentview(the current class).isActivewill enable the constraints. You can set up multiple constraints and enable, disable them based on our needs.
Layout Anchors

Base Layout Anchors
leadingAnchor– the leading edge of the view’s frame.
The text starts on this edge.trailingAnchor– the trailing edge of the view’s frame.
The text finishes on this edge.topAnchor– the top edge of the view’s frame.bottomAnchor– bottom edge of the view’s frame.leftAnchor– the left edge of the view’s frame.rightAnchor– the right edge of the view’s frame.

Like Arabic, Hebrew etc. languages are written from right to left. Exactly for this reason you have leadingAnchor and trailingAnchor. You want that the UI stays the same but turns some label text direction.
Deduced Layout Anchors
centerXAnchor– the horizontal center of the view’s frame.
½ (leading + trailing)centerYAnchor– the vertical center of the view’s frame.
½ (top + bottom)widthAnchor– the width of the view’s frame.
|trailing — leading|heightAnchor– the height of the view’s frame.
|bottom — top|
Text Layout Anchors
This Anchors works just for UI elements like UILabels and UITextViews.
This is all about text and fonts.

lastBaselineAnchor– For views with multiple lines of text, this anchor represents the baseline of the bottom row of text.firstBaselineAnchor– For views with multiple lines of text, this anchor represents the baseline of the top row of text.

How to Apply Constraint
constraint(equalTo:)constraint(equalTo:constant:)constraint(greaterThanOrEqualTo:)constraint(lessThanOrEqualTo:)constraint(greaterThanOrEqualTo:constant:)constraint(lessThanOrEqualTo:constant:)
Example how to set constraint

Layout Priorities
The priority is represented by an integer value within the range from 1 to 1000. The higher the priority, the more important the constraint. It helps the system to decide what constraint to use and to make appropriate tradeoffs.
By default constraint priority is 1000. If there are some conflicts then the constraints will fail. This will not crash the App but can have some visual glitches.

System Priorities:
- UILayoutPriority.required //1000
- UILayoutPriority.defaultHigh. //750
- UILayoutPriority.defaultLow //250
Example of the Priorities
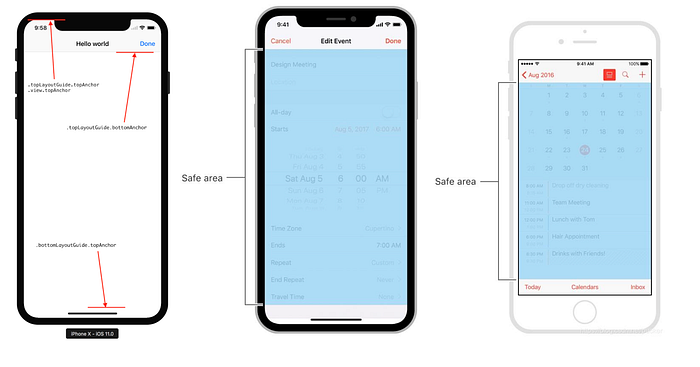
Safe Area
Introducing devices with notch, safeArea became a standard. It represents the central usable area.
VFL (Visual Format Language)
Visual Format Language is just another way to set up constraints. My personal experience is that it is good for some medium layout complexity. But as the UI begins to be more and more complex, it is harder to understand and to change.
VFL numbers and symbols to describe the layout:
- | superview
- H: (Horizontal) horizontal direction
- – standard spacing (usually 8 points, value can be changed if it is the spacing to the edge of a superview)
- == equal widths (can be omitted)
- -20- non standard spacing (20 points)
- [] (brackets) name of the object (
UILabel,UIButton,UIView, etc.) - () (parentheses) size of the object
- <= less than or equal to
- >= greater than or equal to
- @250 priority of the constraint; can have any value between 0 and 1000
250 — low priority
750 — high priority
1000 — required priority
Example:H:|-[icon(==date)]-20-[iconLabel(120@250)]-20@750-[date(>=50)]-|
Example of VFL
Full code is on this link GitHub. It has screens created on both ways. And introduction how to organise nicely the project.
Sum Up
Now you know at least 2 more ways to layout the UI. In case that terminal drops you a message that the constraints failed and you can’t easily read it. Don’t worry, there is a good online tool.
If you got to this point, thanks for reading. You deserve a coffee ☕️. 🙂 If you like the content please 👏, share, subscribe, buy a coffee, it means to me. If you have some suggestions or questions please feel free to comment.