Local Notifications, Push Notifications. Location Triggers. Multimedia Messages Enriched with Image, Video, Gif or Full Custom UI. iOS15 Changes

Introduction
Almost every app needs some way to communicate with the users. One of the main goals for the marketing team is to reach more users with relevant information, engage with them, and help to understand the value of the application. One of their favourite choices is push notifications.
When I started to work with notifications after a couple of tutorials I thought I knew everything. And with every feature request, I have found something new. This article will cover a really wide range of knowledge based on my experience.
Before we go into the details, here is a textual-based game I worked on a long time ago that uses notifications heavily. It is supported on iPhone, but more fun can be had on Apple Watch. Lifeline: Whiteout
This article will cover several topics like:
- Local notifications
- Push notifications
- Silent push messages
- How to add action buttons
- How to configure it in Xcode
- How to register
- Message types and states
- iOS 15 changes
- APNs
- How to setup certificate
- Rich media (multimedia messages with image, GIF, or video),
Notification Service Extension - Rich media (messages with custom created content),
Notification Content Extension - Example how to present
MapKit - How to handle the badge count
- How to test on simulator and on device
- Useful tools
- Good third-party push notification services
Subscribe for Notifications
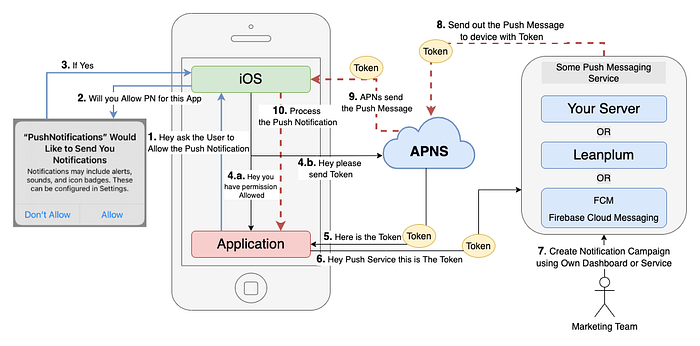
Regardless of whether the local or push notification type is picked, the first step is to ask the user to allow them to receive the notifications. To register, to be able to receive notifications. Lots of time it is called from application (_:didFinishLaunchingWithOptions:), but a much more neat option is to call it from your custom screen to explain to the user why we will use the local or/and push notifications and its benefits.
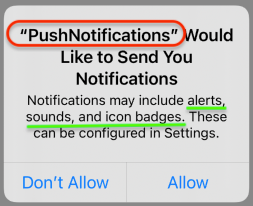
When we call requestAuthorization(options:) the OS will present the Alert view that can be seen on the previous image. With red is marked the application name. The green underlying is the requested options.
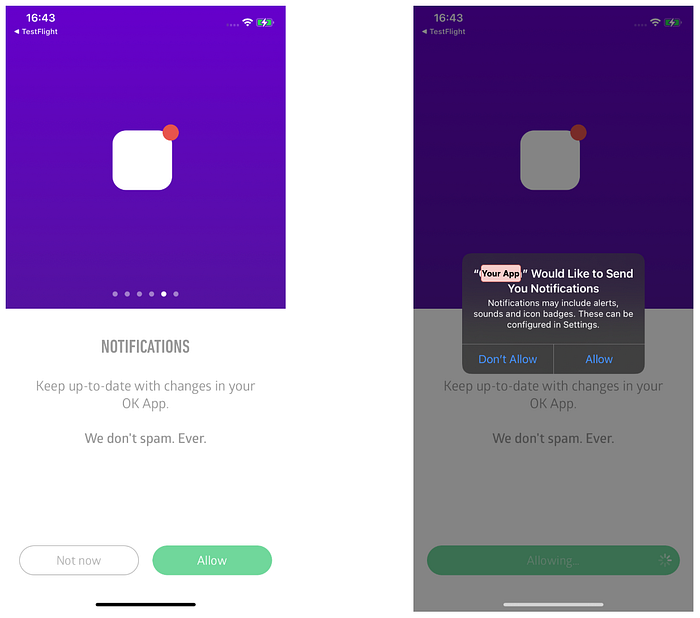
The image below shows one of the examples of how the custom screen explains the permissions. Must mention that when the OS presents the alert, the application will go to the background, and after the user answers the OS permission question, then it will come back to the application. It means it will trigger the AppDelegate / SceneDelegate lifecycle methods.
The first step is to import UserNotifications.
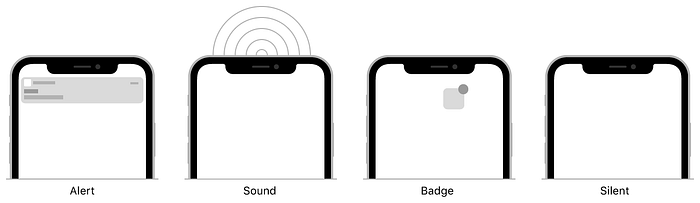
Next is to create configuration that we would like to use, e.g., let options: UNAuthorizationOptions = [.alert, .sound, .badge].
Request permission for notifications
This alert, sound and badge will cover most application needs but there are more parameters like for carPlay, criticalAlert or maybe provisional etc.
alert— To be able to get the notification pop up, alertsound— To enable sound, the default isUNNotificationSound.defaultbadge— Enable the use of “red dot” with number on application iconcarPlay— To be able to display notification in CarPlay (Link to really nice tutorial of the use CarPlay from a friend)criticalAlert— Critical alert goes over “Do Not Disturb.” Must be allowed by Apple’s special Entitlementprovisional-With this option, you don’t need to ask the user for permission. You can send notifications right away. But just to the Notification Center
If you want to check what options are allowed in the application for the user you can do that using the following code:
How to check from app the Permissions
Provisional Messages
As mentioned, these are silent messages that make no attention and the user can receive them from the app installation. No need to ask for permission. You still need to call the method requestAuthorization(options:). But it will not prompt any questions for the user.
let options: UNAuthorizationOptions = [.provisional]
In the previous image, you can see how the user sees the message. The user can still configure it from Settings as the user wants.
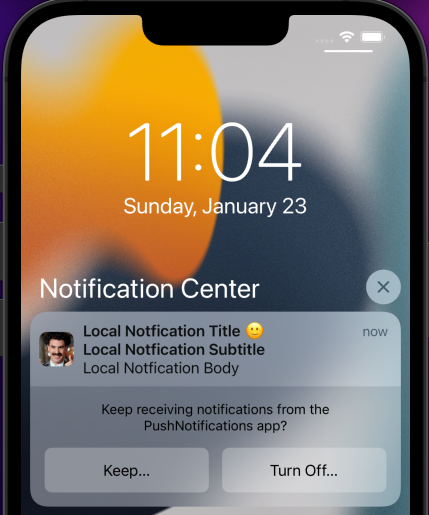
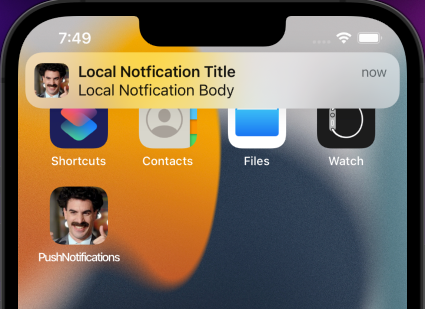
Local Notifications
This kind of notification, as its name already tells us, is created locally, offline. Local notifications can be scheduled by time interval as a reminder, which will trigger them by exact time of a day as event or by geographical location, geofence.
Examples:
- If you want to notify the user to stop playing World of Warcraft and to check on the meat that’s been cooking for 20 minutes or it will burn (Time Interval).
- That today on Feb. 1st is the birthday of your best friend (Calendar).
- That you are passing by the favourite store and need to by milk (Location)
- The file’s download has completed in the background (Time Interval/Instant)
To create local notifications you need to ask the user for permission like in the previous explanation.
When you create a local notification, the OS takes over the responsibility. When your app is killed or in the background, the OS will make sure that it will be presented to the user when needed.
Local notifications are the way to draw users’ attention and increase engagement with the app.
Considering the technical part, every local notification has three parts:
Content
These are the visual and configurational properties of the notification.
title— Simple String, title of Messagesubtitle— Simple String, subtitle of Message. This is usually optionally used by the marketing teambody— Simple String, subtitle of Message. Content of the Messagesound—UNNotificationSound.defaultis the default. You can use a custom onebadge— The number on the “Red Dot.” You can use this to set the exact number. But you can have your own system that will add or subtract to the count based on your needs. You can combine it with your inbox messages, some app-specific thread messaging system. Whatever you support.user info— You can pass some data as a key:value pair.attachments— You can use multimedia files that are on your phone. Basically, you can have some video, image, or gif in the bundle of the application and use it as a resource. I did not use this, as Rich Media was a much better option as resources are downloaded. Later this will be explained.categoryIdentifier— This is an interesting option. You can use this to add Action Buttons to a notification or to distinguish between rich media (Notification Service Extension or your Notification Content Extension actions).interruptionLevel— iOS 15 brought this. This tells the system how important the message is and when to send it.active— The system presents the notification immediately, lights up the screen, and can play a sound.critical— The system presents the notification immediately, lights up the screen, and bypasses the mute switch to play a sound.passive— The system adds the notification to the notification list without lighting up the screen or playing a sound.timeSensitive— The system presents the notification immediately, lights up the screen, and can play a sound, but won’t break through system notification controls.threadIdentifier— You can assign each local or push notification an identifier to group them visually on Notification Center. For example, all info messages to be grouped.
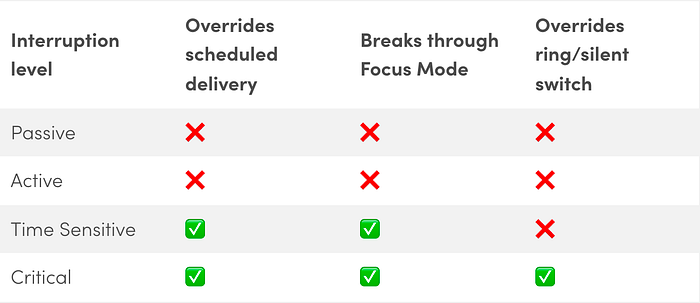
interruptionLevel on iOS 15Trigger
This is the type of trigger that will wake up the OS and send the notification.
time—timeInterval, duration what will pass till notification is firedcalendar— exact date-time when need to fire the notificationlocation— When you enter or exit a specific region, the notification will be triggered.
Request
Request is used to do nothing more than group all the data from above. It has the content, trigger and the identifier.
It is worth mentioning that an identifier is important in case you want to cancel the notification. We already said that you create the notification in the app. But the OS takes over and adds to the list. If you have no identifier then you can’t ask the OS to cancel it.
UNUserNotificationCenter.current().removePendingNotificationRequests(withIdentifiers: "my_notification_id")
The code example of notification types is below:
Time Interval local notification
Calendar local notification, exact date will be the Trigger
For Location type of a local notification, I will show an example but will not go into detail. It is a story for itself, and I will create a dedicated article about this. On a high level you need to use the CoreLocation module to be able to use Geofencing.
Here’s the code:
Location local notification with Geofence
In the Content section, you could see threadIdentifier. You can use this to group notifications. For example, by unique user or deal promotions. Prior to iOS 15, there was a property summaryArgument which was an addition beside the grouping but now it is deprecated.

Listen to the Events
At this point we have imported UserNotifications registered with requestAuthorization(options:) but we still can’t listen to events.
The next step is to conform to protocol UNUserNotificationCenterDelegate. You can do it in multiple ways. I did this for simplicity in AppDelegate, but you can create a separate Service/Manager or do it in ViewController, all this is situational and there is no final way.
If you want to receive notifications in the foreground, then in the method userNotificationCenter (_:willPresent:withCompletionHandler:) you can configure it, look at completionHandler([.alert, . badge, . sound]).
Now you can listen for local / push notifications with userNotificationCenter (_:didReceive:withCompletionHandler:) and userInfo data. If it has custom Action buttons I’ll explain these in the next section.
If you want to create multiple local notifications, care to not have the same identifier as the new message will override the old one with the same identifier. Here’s the code:
Configure notification to be able to listen to some Events
Action
We can define Actions / Buttons for notifications. To do this, we need to define actions with UNNotificationAction. And then to add them to the category with UNNotificationCategory. The code is shown below:
How to Create Actions on notifications
If you scroll back when we have created the notifications and add the next line:
content.categoryIdentifier = "myActionCategoryIdentifier1"
then it will trigger the category1 type of notification. You can see that you can create lots of category types with different numbers of buttons and functionalities.
When you receive the next notification and pull the notification down or long-press it, you will see the Action buttons. The visual appearance of the buttons can be different between iOS versions.

To be able to detect what button is tapped by the user, modify the userNotificationCenter (_:didReceive:withCompletionHandler:) method with the following lines of code:
Listen for notification Button Tap
For example, you can snooze a repeating alarm and it will ring/send a local notification again in five minutes. But, you can also delete the notification, which will cancel this notification with an identifier.
APNs (Apple Push Notification service)
At this point, we are almost ready for push notifications. But before we jump into that, we need to understand how to register for push notifications. APNs is the Apple Service that lets us request the Push Token.
Notifications Permission State
There are a couple of states of push notification permission. You can use this to decide should you present them the notification permission alert or notify your backend side that the user rejected or disabled the Notifications.
notDetermined— User is not asked for permissionsdenied— User is presented the alert but deniedauthorized— User is presented the alert and user allowedprovisional— User is not asked directly, but in code is set for this Permission typeephemeral— The app is authorized to schedule or receive notifications for a limited amount of time. For example, AppClip can do this with some configuration inInfo.plist. The details are in the next link.

ephemeral AppClip notification is enabledCode example that can be asked for the system.
Push Notifications
All the UI that we have seen till now with local notifications can be applied also with push notifications. The only difference is that push notifications are triggered remotely and must go over APNs.
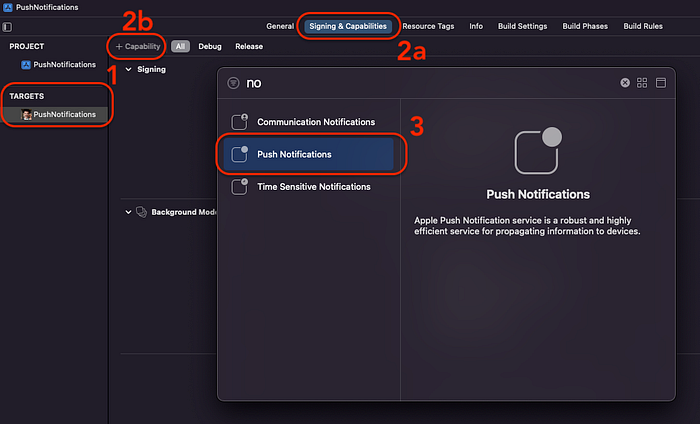
Considering the configuration, first we need to enable push notifications for the project in Xcode.
The register part is almost the same as with local notification. Actually, we will use the same method as above requestAuthorization(options:). The difference is that now we also want to call
UIApplication.shared.registerForRemoteNotifications()
We can see it is just a couple lines of code difference
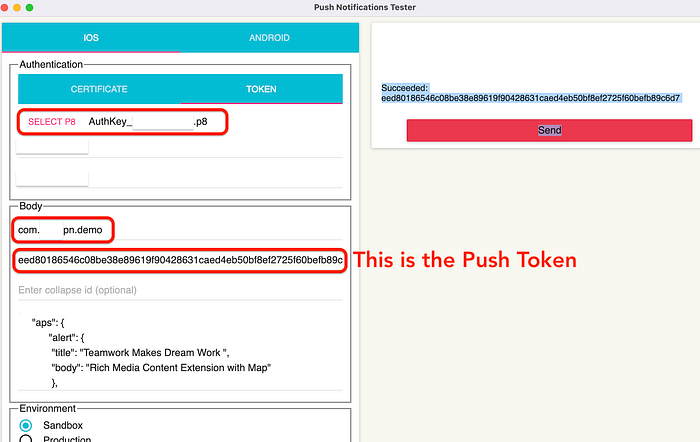
This will trigger the application (_:didRegisterForRemoteNotificationsWithDeviceToken:) and the token will be received. Or in case of a fail application (_:didFailToRegisterForRemoteNotificationsWithError:).
Token looks something like this:9340516ea8a5ae6b149fa90c07efc1f738b2b0d38463cd326858921fc0d93a91
As APNs are the central point from where we get the Remote Notification Token, sometimes firewalls don’t want to let through. Especially in the case of the wireless. At least this is my experience and assumption. Resetting wifi, router, or switching to a cellular connection can help.
Also, keep in mind this is an async process. It could take a while to receive the token — second, even minutes sometimes.
The token is received in data form and can be converted into human-readable code
We should send this token to our server or to a third-party service that we or the marketing team will use to create the push messages.
There are a bunch of these kinds of third-party services like LeanPlum, CleverTap, OneSignal, Firebase Cloud Messaging, UrbanAirship, etc. It can make the integration much easier.
Testing Push Notifications
If you are using a simulator, don’t worry. There is a way to do it.
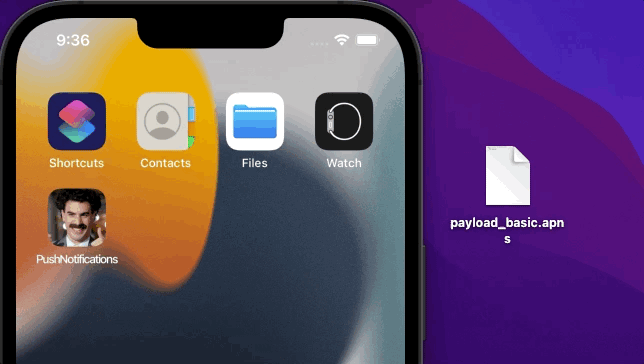
First, you need a file with the extension .apns. Something like payload.apns. It has a JSON-like structure.
Payload.apns file
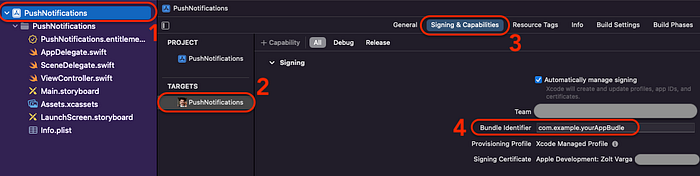
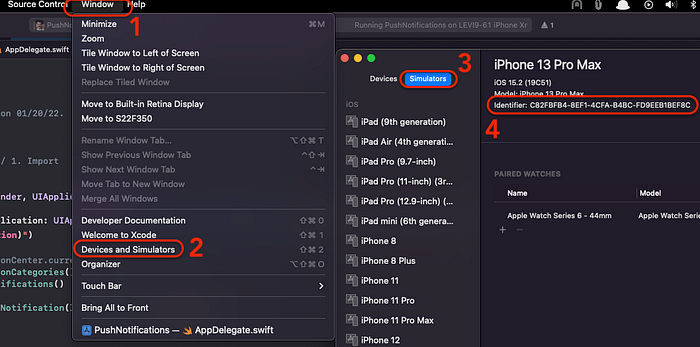
You need to change the Simulator Target Bundle value in the apns file to your app Bundle Identifier. The next image shows how to find it.
The apns file’s most used properties are:
alert–title,subtitle,bodywhich is self-explanatorybadge– Number of Red dots.sound– The “default” string to play the default sound or “my_sound.mp3” from the bundlecategory– This is the string that will determine the Action ButtonscategoryIdentifierfrom the local notification partthread-id– This is the id that is used to group the messagescontent-available– This is the background notification flag. “To perform a silent background update, specify the value1and don’t include thealert,badge, orsoundkeys in your payload.” — Applemutable-content– If this is1, then it means the service app extension is used. Later, I will tell more about this.interruption-level– This came with the introduction of iOS 15. The string values “passive”, “active”, “time-sensitive”, or “critical”.
A detailed list can be found at this link.
Example of some properties
One more way is to test push notifications from Terminal.
$ xcrun simctl push device_identifier com.example.yourApp payload.apns
You need to replace the device_identifier. You can see how to find this value from the next image.
If in the payload, you have the “Simulator Target Bundle”, then no need to type in a command. If you have configured the command the right way, then something like “Notification sent to ‘com.example.myApp” will pop up on the terminal.
Silent Push Notification
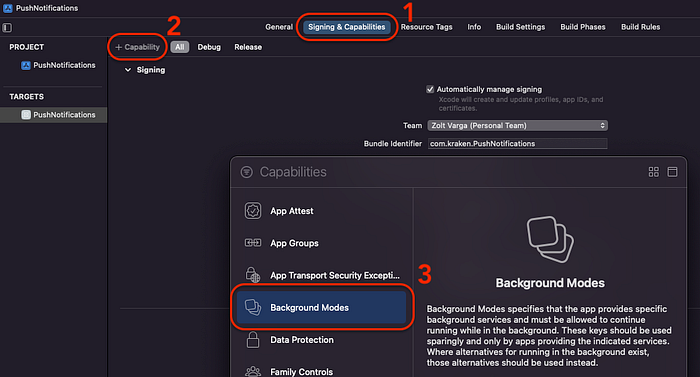
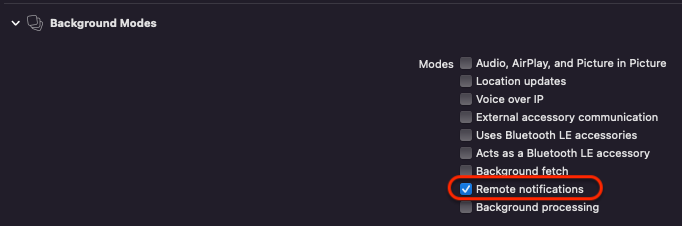
Silent push notifications are messages without alert, UI and sound, and can be received in the background. To be able to use silent push notifications it is not enough to configure the payload with "content-available": 1. We also need to configure the application. We need to enable Background Modes for Remote notifications.
Silent push notifications can’t contain any alert, title, body, or sound etc.
Silent push notification payload
Silent push notifications from a practical point of view are used to initiate some background fetch API calls, to start some updates, to be able to perform a task in the background, etc. It wakes up the application from the background.
Badge Count
You can set the badge with a number on the apps icon to let the user know their attention is needed. That the app has something new.
If you have no custom mechanism, then the easiest way is to reset it. To do that in AppDelegate event applicationDidBecomeActive(_:) (or sceneDidBecomeActive(_:) in case of SceneDelegate), call the next line of code:
UIApplication.shared.applicationIconBadgeNumber = 0
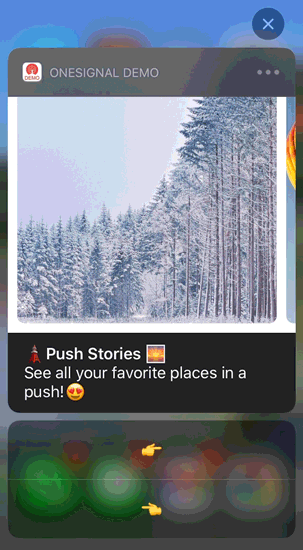
Rich Media (Multimedia Notification)
This is the most fun part. We can use an image, video, gif, or create a Custom UIView.
Push notifications have a maximum payload size of 4KB. With Extensions, we have a chance to intercept any incoming push notification and modify the title, decrypting any encrypted data or even downloading media attachments.
If you are not familiar with the Extensions, they are like mini applications that are in some way connected with your main app, bundled inside. They are the “gatekeepers” of your app. In the push notification case, they have a chance to do some action before your app is presented with the push notification.
Example of Payload Content
As you see “mutable-content”: 1 indicates that this is a rich media type push notification.
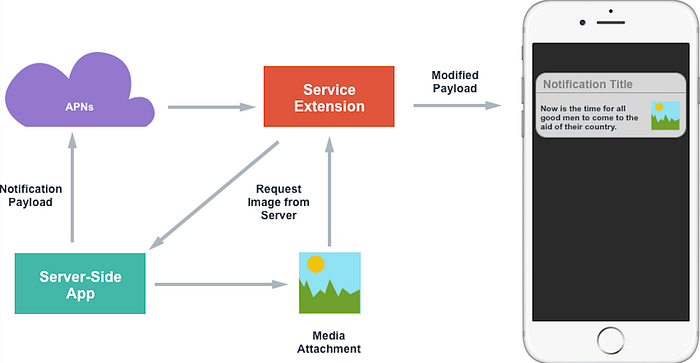
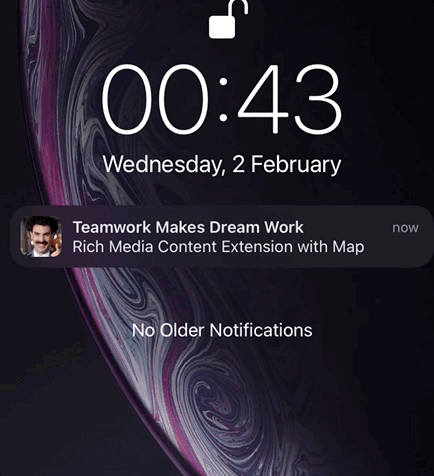
Notification Service Extension
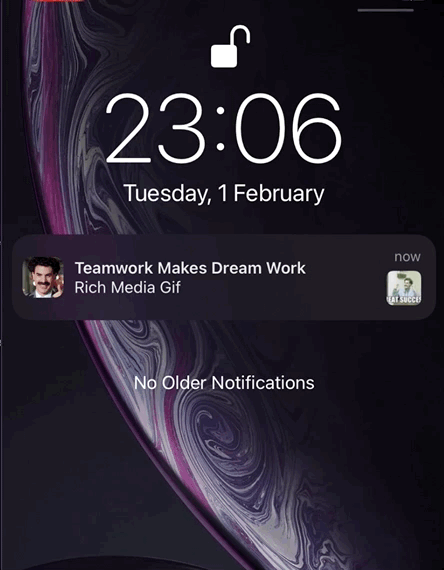
At the start of the article, you could see a Rich Media push notification with the video (mp4) extension. Below you can see one with a photo:

In our case, the Service Extension has a chance to download some picture, video, or gif, depending on what URL is in the payload. For example, OS gives the Service Extension some time to modify the title, body, or maybe to download an image. If you could not modify the content, it will fall back to regular push notifications with original content from the payload.
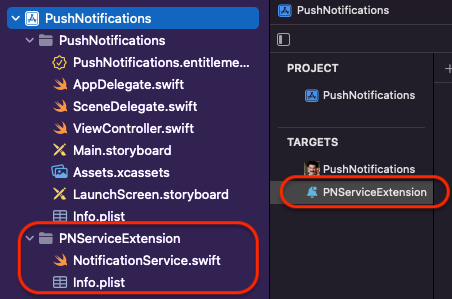
To add a Notification Service Extension to the project, go to menu – > File -> New -> Target. Pick Notification Service Extension, and click the Next button.
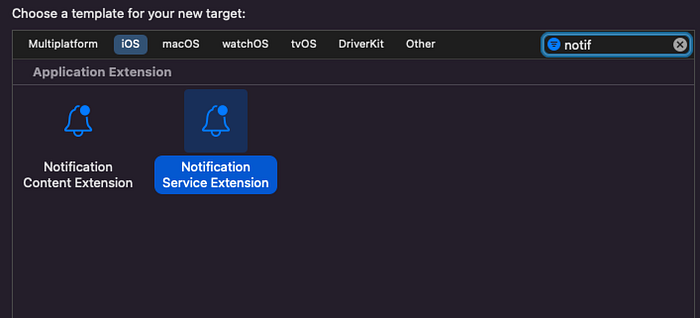

Look into Organization Identifier and Bundle Identifier. The Extension identifier is based on your main app target bundle identifier, the difference is in the postfix. This way iOS knows in what application the Extension is embedded.
With the method, didReceive(_ request:), we can catch and modify the content. serviceExtensionTimeWillExpire() is a fallback option in case we could not modify the content. For example, if the download of the image failed or took too much time.
Basic Notification Service Code
Complete code can be found on the next link.
Example of how to add multimedia resources to the payload
You can see that Rich Media also can have Action buttons. You need to register them in Service Extension. But the tap handling needs to be done in the application. In our case, in AppDelegate.
Rich media Action buttons
Notification Content Extension
Content Extension is all about creating a Custom View. Notification Content Extension uses a NotificationViewController, which is a subclass of UIViewController. It also creates in the folder storyboard and Info.plist.
The setup is similar to Service Extension. Just follow the previous steps.
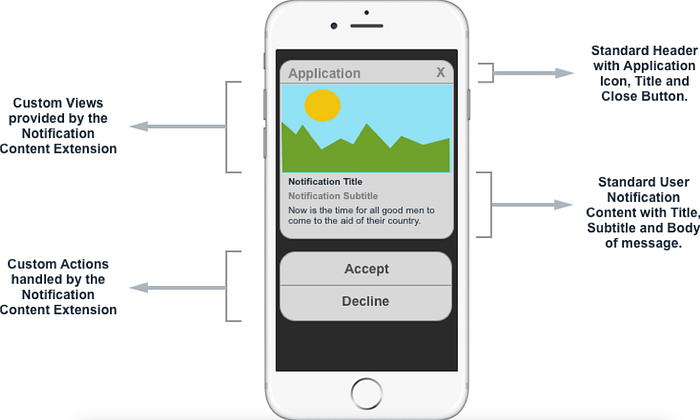
Below you can see a really nice Custom View—a carousel with multiple images, titles, subtitles, and buttons. Every image could have a different text. Every image could have a different Deep-link.
To be able to use the Content Extension in Info.plist, find UNNotificationExtensionCategory and its value that needs to be added in the push notification payload under the “category” key.
This kind of notification can even have integrated maps or any framework.
Of course, keep it lightweight.
Now the possibilities are almost unlimited.
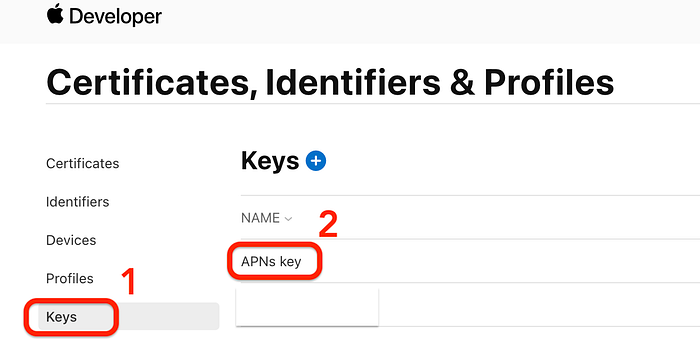
Certificates
I will try to explain this simply and focus on Push certificates.
Go to https://developer.apple.com/account/ Certificates, Identifiers & Profiles.
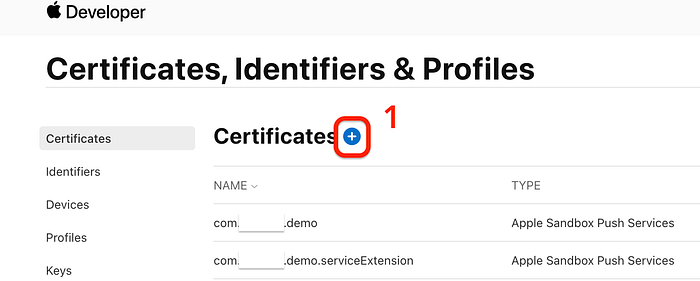
- Click on the “+” sign, Apple push notification service SSL.
- Select the App ID (assume you have created it)
- Download the
aps_xyz.cer - Double click it, go to
Keychain Access.app(cmd + space opens the Spotlight and,type Keyc…) - You should see Apple Sandbox Push Services: com.example.demo (your bundle id)
- Right-click
- Export “Apple Sand…”
- Save the .p12 file.
The backend will ask for this .p12 file mostly, to be able to send push notifications over APNs. But a better option is to create a key /.p8 file.
Tip
Push certificates expire in one year, and you have to renew them in the Apple developer center and re-upload the new certificate to your push provider/backend every year. If you have more apps, this process needs to be done every year for every app. The p8 / key file works for all your apps in both development and production environments, and it doesn’t expire.
Tools
Here are tools to be able to test easily on the device:
https://github.com/onmyway133/PushNotifications 👈 My recommendation
https://github.com/noodlewerk/NWPusher
Conclusion
Now you know lots of things to do with User Notifications as Apple names them. As I said, I needed years and years to gather all the info and learn it. Please feel free to tell me something that I may be interested in and don’t know.
If you got to this point, thanks for reading. You deserve a coffee ☕️. 🙂 If you like the content please 👏, share, subscribe, buy a coffee it means to me. If you have some suggestions or questions please feel free to comment.