
How to make order in AppDelegate
Introduction
I was writing about how to organise your iOS project. And got many questions to elaborate on how to avoid having “Massive AppDelegate”.
If you have already worked on a couple of projects, you have a high chance that you have encountered the “Massive ViewController” issue.
To resolve this you can use extension to extract some logic, to use child view controller, or to use some architectural pattern like MVP, MVVM, VIPER, CleanVIP etc.
On the contrary, many organized projects still have huge AppDelegates. In this article, I will try to present my favorite solution for this problem.
The Problem
Almost all the online 3rd party SDK Integration tutorials show their basic implementation and how to initialize them — like Firebase, Realm, AppFlyer, Alamofire etc. You integrate them and initialize them in AppDelegate.
Then the Product Owner asks for new features based on the Push Notification, Location, CoreData, etc.
You add them also to AppDelegate. At this point AppDelegate application (_:didFinishLaunchingWithOptions:) already have a bunch of code that logically should have some separation. And this is just one method. Won’t even go farther. We call this a “Massive AppDelegate”.
But don’t worry Composite Design Pattern to the rescue.
Designing Custom AppDelegate
Before we start to work with AppDelegate. I would like to introduce a nice Organisation / Folder structure.
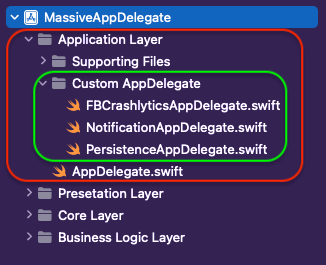
As you can see all what belongs to Application Layer it is separated, including AppDelegate and Custom AppDelegates and Supporting Files (like Info.plist, Assets, Configs etc.).
For every logical component like Notification or Firebase Crashlytics we will create one Custom AppDelegate.
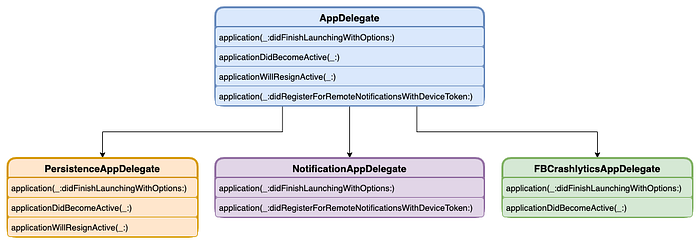
CustomAppDelegate needs to integrate just the used methods, as you can see from the image above. NotificationAppDelegate has application (_:didFinishLaunchingWithOptions:) and application (_:didRegisterForRemoteNotificationsWithDeviceToken:).
If you take a closer look, theAppDelegate class conforms to UIApplicationDelegate Protocol. This gives us the optional methods like application (_:didFinishLaunchingWithOptions:).
Prepare the AppDelegate
Let’s explain step by step the code below.
- Step 1. — We need to create list of
CustomAppDelegatesof typeUIApplicationDelegate(line 10) - Step 2. — Add to the list every newly created
CustomAppDelegatese.g.: likeNotificationAppDelegate(line 16) - Step 3. — Inside every
AppDelegatemethod add something like (e.g.: line 33)
appDelegates.forEach { _ = $0.application?(application, didFinishLaunchingWithOptions: launchOptions) }
This will make sure that for every CustomAppDelegate the method will be called.
And that’s it. The AppDelegate in future, mostly will have no need to have big changes. This is also a convenient way to refactor your existing AppDelegate if legacy code is in question.
Code Example of Clean and Neat AppDelegate
Custom AppDelegate Implementation
If you have properly set up the AppDelegate, here you have little work to do.
- Step 1. — Make sure your
CustomAppDelegateconforms toUIApplicationDelegate. - Step 2. — Start typing the method what you need, autocomplete should suggest same as with regular
AppDelegate. - Step 3. — Integrate 3rd Party SDK methods based on their documentation.
That’s all. You have logically separated components.
Example of CustomAppDelegate
If we start the code then we can see that all implemented methods will be fired one by one.
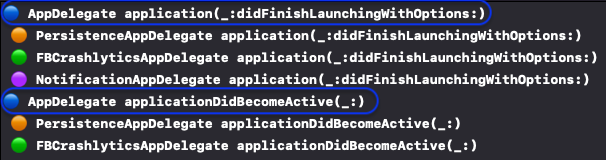
In case the App is going in the background, PersistenceAppDelegate wants to listen for applicationWillResignActive(_:) event to make some last-minute save.

We can see that only the PersistenceAppDelegate event is fired. The rest of CustomAppDelegates were not interested in listening for this event.
The whole codebase is available on this GitHub Repository.
Recap
If you begin the project it is no effort to organize AppDelegate right away.
If you have an ongoing project this is an easy way to refactor it fast, painlessly.
If you have SceneDelegate this logic can be also applied easily.
If you got to this point, thanks for reading. 🙂 If you like the content please 👏, share, subscribe, buy a coffee it means to me. If you have some suggestions or questions please feel free to comment.