
The Pros and Cons of Deep Links and Universal Links
Introduction
Effective communication with users is crucial for the success of any great application. A dedicated marketing team is often responsible for this important task, ensuring that the application’s features and benefits are effectively conveyed to the target audience.

As someone with experience in the field, I have observed that non-technical individuals often struggle to understand the potential benefits and uses of deep linking in applications. To better illustrate its value, I will provide a few examples of its practical applications.
- Email- The email contains a deep link that will take the user directly to the screen in the application that explains the benefits of enabling push permissions. This will help the user understand why it is a good idea to enable this permission.
- SMS- The sms contains a link that redirects the user to a verification screen or promotional page.
- Push Notification: By clicking on the push notification, the user will be redirected to a screen containing the deal of interest, such as the new shoes the user was “watching” and waiting for a sale.
- In-App Message / Inbox: Modern marketing tools and SDKs have In-App Messages in Inboxes to communicate with the users. There are several ways to improve the communication of a new movie release to users who have it on their “want to watch” list. One option would be to use a targeted in-app message or inbox notification that is only shown to users who have the movie on their list. This ensures that the message is relevant and timely for those users, and it allows you to personalize the message to make it more engaging. These messages can have deep links that open the app directly on relevant pages.
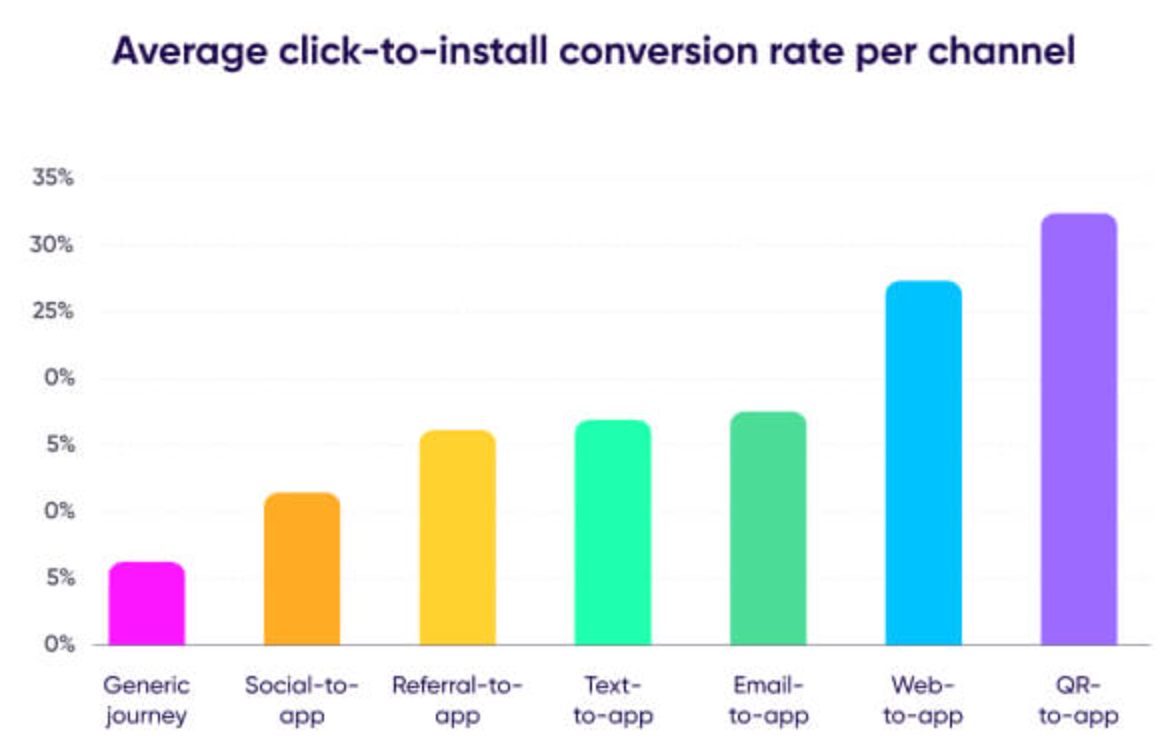
- QR Code: By implementing a QR code system for payment, businesses such as banks and car washes can make the payment process more efficient and convenient for customers. The QR code, when scanned, can automatically open and pre-fill the payment form with the necessary information, eliminating the need for customers to manually input their data. This can save time and reduce the likelihood of errors, making the payment process smoother and more seamless for both the business and the customer.
The list goes on. These are just a couple of examples. Deep links are a type of link that redirect users from any source (such as a website, social media platform, or SMS message) to a specific location within a mobile application. This allows users to easily access specific content or features within an app, without having to navigate to them manually. This can be particularly useful for app developers who want to provide users with a seamless experience, as well as for marketers who want to drive traffic to specific parts of an app.
In this article, we will discuss the differences between Deep Links and Universal Links and their importance in mobile app navigation.
Deep Links vs Universal Links
Deep links and universal links are both types of links that can be used to direct users to specific content within a mobile app. However, there are some key differences between the two.
Deep links are links that are specific to a particular app. When a user clicks on a deep link, they are taken directly to the designated content within the app, if the app is installed on their device. If the app is not installed, the user will be taken to the app store to download it. Deep links are typically used to link to specific pages or sections within an app, such as a product page in an e-commerce app.
Universal links, on the other hand, are links that work across multiple apps. When a user clicks on a universal link, the system will try to open the designated content within the app if it is installed on the user’s device. If the app is not installed, the user will be taken to the corresponding website instead. This allows for a seamless experience for the user, as they will always be able to access the content, regardless of whether the app is installed on their device.
In summary, the main difference between deep links and universal links is that deep links are specific to a single app, while universal links can be used to open content in multiple apps.

Deeplinks (URL Scheme)
Easy implementation.
No Back-End intervention is needed.
To use deep links, you will need to create a URL that points to a specific piece of content within your app. This URL will typically use a custom URL scheme that is specific to your app. For example, if your app’s custom URL scheme is “myapp://”, you could create a deep link like this:
myapp://products/123
This deep link would direct the user to the product page with the ID of 123 within your app.
To handle deep links in your app, you will need to add some code to your app that can recognize and process the custom URL scheme. This will allow your app to open the appropriate content when a deep link is clicked.
It’s worth noting that deep links only work if the app is installed on the user’s device. If the app is not installed, clicking on a deep link will do nothing. This can be a disadvantage compared to universal links, which can fall back to a website if the app is not installed.
URL Scheme Setup
To set up a URL scheme for your iOS app, you will need to follow these steps:
- Open your app’s Xcode project and navigate to the
Infotab of your app’s target. - In the
Infotab, scroll down to theURL Typessection and click the+button to add a new URL type. - In the
URL Schemesfield of the new URL type, enter a unique identifier for your URL scheme. This identifier will be used to identify your app when a URL with your scheme is opened on a device. - If you want to specify additional information for your URL schemes, such as a URL identifier or a role for your app, you can fill in the optional fields in the
URL Typessection. - Once you have entered your URL scheme information, save your changes and build your app.
- To test your URL scheme, open the iOS Simulator and run your app. Then, in the Simulator, open the
Debugmenu and choose theOpen URLoption. In theOpen URLdialog, enter a URL with your app’s URL scheme, and clickOpen. This should launch your app and open the specified URL within it.

By following these steps, you can set up a URL scheme for your iOS app and test it in the iOS Simulator. You can also use the same process to set up a URL scheme for an Android app, but the details may vary depending on the development tools you are using.
Universal Links
Universal Links are introduced with iOS9. They are simple URLs means they are more compatible with different systems. The trick with Universal links is that you must own the website. So this means you can’t just create a universal link to the Apple site. This is achieved by that, that your website has one file that contains allowed links. This file name is ‘apple-app-site-association.json’ (or on Android ‘assetlinks.json’). This JSON file needs to be in the root folder of your website inside the .well-known named folder. On the Android side, Universal links are called App links.
To use universal links, you first need to enable them for your app. This typically involves setting up a special entitlement file on your server that contains information about the domains and paths that you want to link to. You will also need to add some code to your app to handle universal links and register your app’s supported domains and paths with the system.
Once you have set up universal links for your app, you can create links that point to specific content within your app using standard URL syntax. For example, if you wanted to create a link to a product page within your app, you could use a URL like this:
“https://www.example.com/products/123“
When a user clicks on this link, the system will try to open the app and direct the user to the product page with the ID 123. If the app is not installed, the user will be taken to the corresponding website instead.
It’s worth noting that for universal links to work properly, you will need to ensure that the link’s domain and path match the ones that you have registered with the system. Additionally, the user’s device must be running iOS 9 or later, and the app must support universal links.
From practical standpoint clicking on universal link app will be opened, in AppDelegate

will be called. After this, the app’s responsibility is to handle the URL parameter. Usually, first, need to verify if the URL parameter path part can be handled with the app. If the path is valid (e.g.: products/123 for example), then you can redirect the user to a specific part of the app or show some popup screen. If you want to let just registered users have this ability then this is the moment when you can do some checks.
In the case of the previous example, the link would look like this:

path // products/add_cart?type=iphone14&discount=black_friday&product_id=12345
queryParams // Dictionary<String, String>
“type”: “iphone14”
“discount”: ”black_friday”
“product_id”: 12345
Universal link Setup
Goto project file, Signing & Capabilities, and select Associated Domains. Add to the list supported site where the AASA file is.

Note that if you use more environments, you need to add all environment URLs in Domains.
Deferred Deep Links
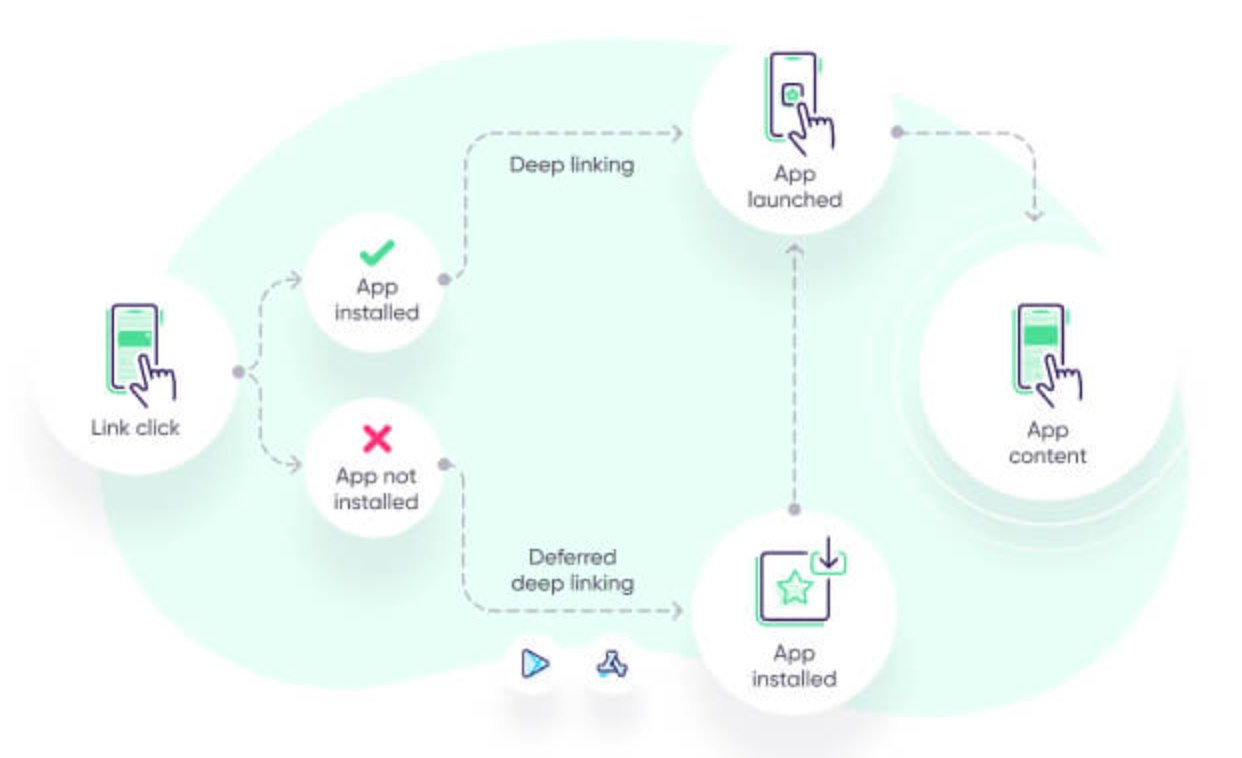
Deferred Deep Links are a type of deep link that allows users to be directed to a specific location within an app, even if the app is not yet installed on their device. This is useful in cases where an app developer wants to provide users with the ability to access specific content or features within an app, but only after the app has been installed.
For example, let’s say that you have an app that allows users to buy tickets for concerts. You could create a deferred deep link that directs users to a specific concert page within your app once it has been installed, even if they clicked on the link before installing the app. This way, users can easily access the content they are interested in, even if they didn’t have the app installed when they first clicked on the link.
To create a deferred deep link, you would need to use a deep link platform or service that supports this feature. These platforms typically allow you to create a deep link that includes additional information about the target location within the app, such as the specific page or screen that the user should be directed to. When a user clicks on the deep link, the platform will attempt to open the app and direct the user to the specified location. If the app is not yet installed, the platform will redirect the user to the app store to download the app, and then automatically open the app and direct the user to the specified location once it has been installed.
Again from a practical standpoint clicking on the link is copied. This means withUIPasteboard.general.string we can access the link and process it after installation, user registration, or any custom flow.
Apple-app-site-association
To be able to open within the app rather than in a web browser, an association file on the app’s website is used for verification, which contains information about the app and its associated domains. When a user clicks on a link to one of those domains on an iOS device, the system checks to see if there is an app installed that is associated with that domain, and if so, it opens the link in the app.
For example, let’s say that you have an app called “MyApp” that is associated with the domain “myapp.com”. To enable Universal Links for your app, you would need to create an association file and place it on your website at the following location:
“https://myapp.com/apple-app-site-association”
The association file is a JSON file that contains information about your app and its associated domains. It should have the following format:

In this example, the “appID” field contains the unique identifier for your app, and the “paths” field specifies the paths on your website that should be opened in your app when a user clicks on them.
Once you have created your association file and placed it on your website, you can test it by clicking on a link to one of your app’s associated domains on an iOS device. If everything is set up correctly, the link should open in your app rather than in a web browser (Safari).
Some cases
Exclude

I find this AASA file useful and full of practical examples: https://www.reddit.com/apple-app-site-association
Validator
To validate an Apple App Site Association (AASA) file, you can use the xcrun altool command in the Terminal app. This command is part of the Xcode command line tools, which are installed automatically when you install Xcode on your Mac.
To use the xcrun altool command to validate your AASA file, you will need to first upload the file to a publicly accessible location on your website. Once the file is uploaded, you can use the following command to validate it:
xcrun altool — verify-app -f /path/to/file.json -u APPLEID -p PASSWORD
Replace /path/to/file.json with the path to your AASA file on your local machine, APPLEID with your Apple ID, and PASSWORD with your Apple ID password.
When you run this command, xcrun altool will connect to Apple’s servers and validate your AASA file. If the file is valid and properly formatted, you should see a message indicating that the verification was successful. If there are any issues with your AASA file, xcrun altool will provide an error message that describes the problem and how to fix it.
By using the xcrun altool command to validate your AASA file, you can ensure that it is correctly formatted and that it will work properly when users try to open your app from a link on your website.
Alternative good Apple-app-site-association.json validator: https://branch.io/resources/aasa-validator
Testing in Simulator And Device
Test Deep links anywhere in your code, you can run:
xcrun simctl openurl booted <INSERT_URL_HERE>
To test deep links in the iOS Simulator, you will need to follow these steps:
- Open the project in Xcode that contains the deep link you want to test.
- In Xcode, select the “Product” menu and then choose the “Destination” option. This will open a menu that allows you to select the target device for your app.
- In the “Destination” menu, select the “iOS Simulator” option and then choose the specific iOS Simulator device that you want to use for testing.
- Once the iOS Simulator has been selected as the target device, you can run your app by selecting the “Run” option from the “Product” menu, or by using the “Command-R” keyboard shortcut.
- When your app has launched in the iOS Simulator, you can test your deep link by using the “xcrun simctl openurl” command in the Terminal app. This command allows you to open a specific URL in the iOS Simulator, and you can use it to test your deep link by providing the URL of the deep link as the argument.
For example, if your deep link has the following URL:
myapp://page/concerts/1234
You could test it in the iOS Simulator using the following command:
xcrun simctl openurl booted myapp://page/concerts/1234
This command will open the specified URL in the iOS Simulator, which should trigger your app to handle the deep link and open the appropriate page or screen within the app.
Once you have tested your deep link in the iOS Simulator, you can further test it on physical iOS devices by using the same “xcrun simctl openurl” command, but specifying the device’s UDID as the target instead of “booted”. You can find the UDID for a device by connecting it to your computer and then running the “idevice_id -l” command in the Terminal app.
By following these steps, you should be able to easily test deep links in the iOS Simulator and on physical iOS devices.
AASA Tips And Tricks
Here are some tips and tricks for working with Apple App Site Association (AASA) files:
- Make sure your AASA file is correctly formatted and valid. You can use the
xcrun altoolcommand in the Terminal app to validate your AASA file and ensure that it is properly formatted and will work correctly. - Place your AASA file at the correct location on your website. The AASA file must be placed at the root of your website, or the subdomain level if you are using multiple subdomains. For example, if your website is
https://www.example.com, your AASA file should be located athttps://www.example.com/apple-app-site-association. - Use wildcards in your AASA file to match multiple paths on your website. The
pathsarray in your AASA file can include wildcards, such as*and?, to match multiple paths on your website. For example, if you want to match all URLs that start with/products, you can use the/products/*pattern in your AASA file. - Use the
appIDfield in your AASA file to match multiple apps. If you have multiple apps that are associated with the same website, you can use theappIDfield in your AASA file to specify the unique app IDs for each app. This allows users to be directed to the correct app when they click on a link on your website, even if they have multiple apps from your company installed on their device. - Test your AASA file on different devices and operating system versions. It’s important to test your AASA file on a variety of devices and operating system versions to ensure that it works properly on all of them. You can use the
xcrun simctl openurlcommand in the Terminal app to test your AASA file on the iOS Simulator, and you can use theidevice_id -landxcrun simctl openurlcommands to test it on physical devices. - After the app installs the AASA file is downloaded and cashed. In the development process, you might need to delete the app and reinstall it in case of an AASA file content change.
- To avoid cashing on CDN for dev mode. In Associated Domain write
applinks:wwwtest.mywebsite.com?mode=developer - To make testing easier you can use https://ngrok.com/ server to expose AASA.json from your device. Ngrok helps to expose the local file to the internet. Associated Domain needs to be set up for this purpose.
E.g:applinks:123–abc–xyz.eu.ngrok.io?mode=developers
By following these tips and tricks, you can improve the reliability and effectiveness of your AASA file, and ensure that it works well for your users.
If you got to this point, thanks for reading. You deserve a coffee ☕️. 🙂 If you like the content please 👏, share, buy a coffee, it means a to me. If you have some suggestions or questions please feel free to comment.